Would you like to submit a survey to your employees, in order to receive suggestions on how to improve the working environment? Are you a teacher and would you like to create a questionnaire to evaluate your students? In these and other similar cases, it may be useful to use Google Forms: a service made available by Google that allows you to create online forms at no cost, collect the results automatically and view them easily.
How do you say? Having never used it before, don’t you have a clue how to create Google forms? And what’s the problem? If you want I can explain how to proceed, both from computer and from smartphone and tablet. While there are, I will also explain how to create Google modules on Classroom, the well-known Google platform dedicated to the educational world, if you are interested in it.
So, can you know you’re still standing there? Strength and courage: make yourself comfortable, take all the time you need to focus on reading the next paragraphs and, more importantly, try to implement the “tips” that I will give you. I am sure that, by following my instructions step by step, you will be able to complete your “enterprise” without the slightest difficulty. Enjoy the reading!
How to create Google forms on PC
If you prefer to create Google forms on PC, all you have to do is go to the main Google Forms page and start creating a new questionnaire. Before illustrating how the service works, however, I would like to remind you that to use the service you need a Google account: if you do not have one, create it now, perhaps by following the instructions I provided in the tutorial I just linked to you .
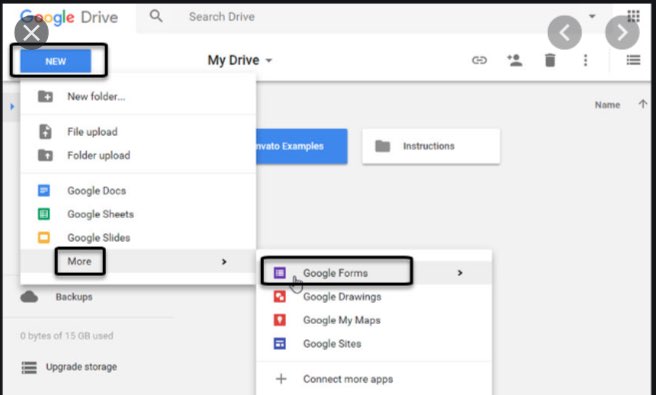
To proceed with the creation of the module, therefore, go to the Google Modules home page, then access your Google account (if you have not already done so) and click on the (+) Empty button, or select one of the presets among those available (eg contact information, invitation to the party, etc.).
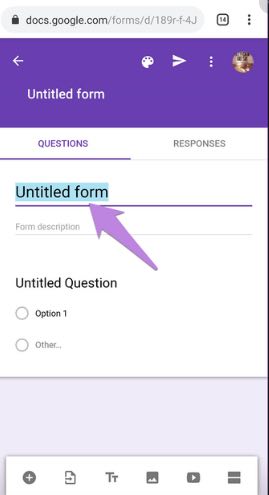
Then, type the title you want to assign to the questionnaire, using the Untitled form field, and enter the description of the form itself, using the Form description text field.
Now, continue filling in the form, providing the title of the question and the answer options in the appropriate fields. Using the drop-down menu on the right, you can select the type of answers to be inserted after the question: Multiple choice, Check boxes, Drop-down list, Paragraph and so on.
Using the buttons on the right of the box relating to each question, you can add a new question (using the (+) button), import questions (using the button depicting the sheet with the arrow pointing to the right), enter a title and description (using the Tt button), add an image (using the button representing the postcard), insert a video (by clicking on the triangle symbol) and add a new section to the form (using the icon of the two rectangles).
If you want to make the answers to some questions mandatory, move the switch lever located at the Mandatory item, present in the box relating to the question of your interest, ON.
Through the buttons that are located in the upper right corner of the page, you can also customize the module theme (using the palette icon), preview it (using the eye symbol) and customize the module settings to turn it into a presentation or a quiz (by pressing the wheel icon).
When you are ready to do so, make the form public by pressing the purple Submit button (top right). Then incorporate it into a Web page, (by pasting in the latter the code you view by clicking on the symbol of the two arrows in the opened box), or forward the form to your contacts, acting via email (the letter envelope symbol) or via link (the chain icon).
How to create Google forms on smartphones and tablets
Are you going to create Google forms on smartphones and tablets? Well, you can do this by acting from the mobile version of the Google Modules site, which works somewhat similar to its desktop counterpart.
To proceed, therefore, go to the main page of Google Forms and access your Google account (in case you have not already done so). Then tap the Empty (+) button and, on the page that opens, indicate the title to be assigned to the form in the Untitled form text field.
Then provide the description of the questionnaire, using the form Description text field. Then, enter the title of the question and the answer options using the appropriate text fields, while using the drop-down menu located a little lower, you can choose the type of answer to be inserted (eg Multiple choice, List to descent, etc.). To make the responses entered in the form mandatory, remember to move the switch located at the Mandatory item to ON.
Using the buttons located at the bottom of the page, you can enter a question (using the (+) button), import questions (using the sheet icon with the arrow pointing to the right), add a title and description (through the Tt button), insert an image (using the postcard icon), add a video (through the button depicting the triangle) and insert a new section inside the module (using the icon of the two rectangles).
By pressing the buttons at the top right, however, you can customize the theme of the module (using the palette icon), view its preview (using the eye symbol) and act on its settings to transform it into a presentation or in a quiz (through the wheel icon).
To make the form public, then tap on the paper airplane symbol located at the top right and select one of the save or share options among those available: for example, you can embed it in a Web page, copying the visible code after having pressed on the icon of the two arrows, send it via email etc.
How to create Google forms on Classroom
If you want to create Google modules on Classroom, the famous service of the Mountain View giant that offers various tools dedicated to online teaching, including the possibility of creating modules to be used as a verification tool with those enrolled in their courses, this is the section of the guide that concerns you closely.
To proceed, connected to the main Google Classroom page, click on the Go to Classroom button and, if you have not already done so, log in with your Google enabled teacher account or with the G Suite for Education account that you have been provided by the institution for which you work as a teacher.
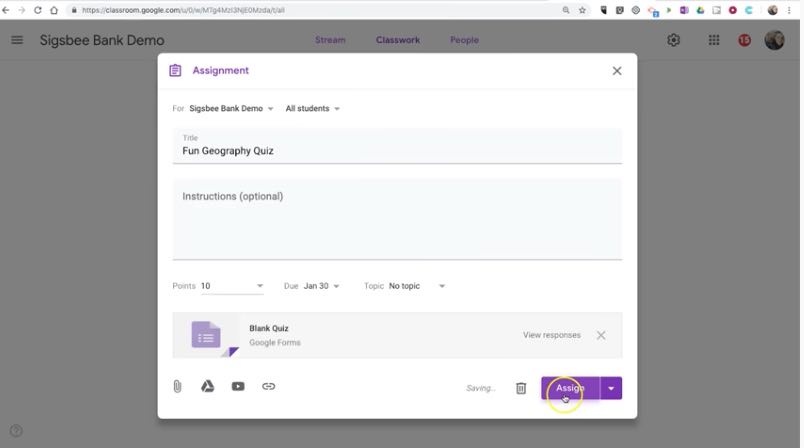
Now, click on the Jobs tab of the course at the top, click on the (+) Create button which is located at the top of the page and choose the type of module you want to create (eg. Task, Quiz task, Question and so on ).
At this point, fill in the form that appears on the screen providing the required information, including the title, the instructions to complete it and any attachments to be included in the form, using the Add or Create buttons.
After completing the questionnaire, use the sidebar located on the right to choose the course and students to assign the verification, score, topic, evaluation grid and so on. If you want to create timed Google forms, also remember to set a deadline by selecting it via the Deadline drop-down menu.
When the work is completed, click on the Assign button located at the top right, to publish and assign the form, or click on the button (▾) located next to the button in question, to save the work as a draft or to schedule its publication in a second moment.
For more information on how to use Google Classroom, I refer you to reading the in-depth analysis that I have devoted entirely to the topic.